
Chapter 6: Tables and Forms
Goals for this Lesson
- Insert a table into an HTML page
- Edit and and modify a table
- Insert a form into an HTML page
- Edit and and modify a form
Exercise
Objective
- Insert, edit, and style tables.
- Insert, edit, and style forms.
Instructions
- Download the file needed here. Create a new site for the project in Dreamweaver: Call the site: Ch 6 Exercise. Be sure to link the root folder and the images folder.
- Open the about.html file.
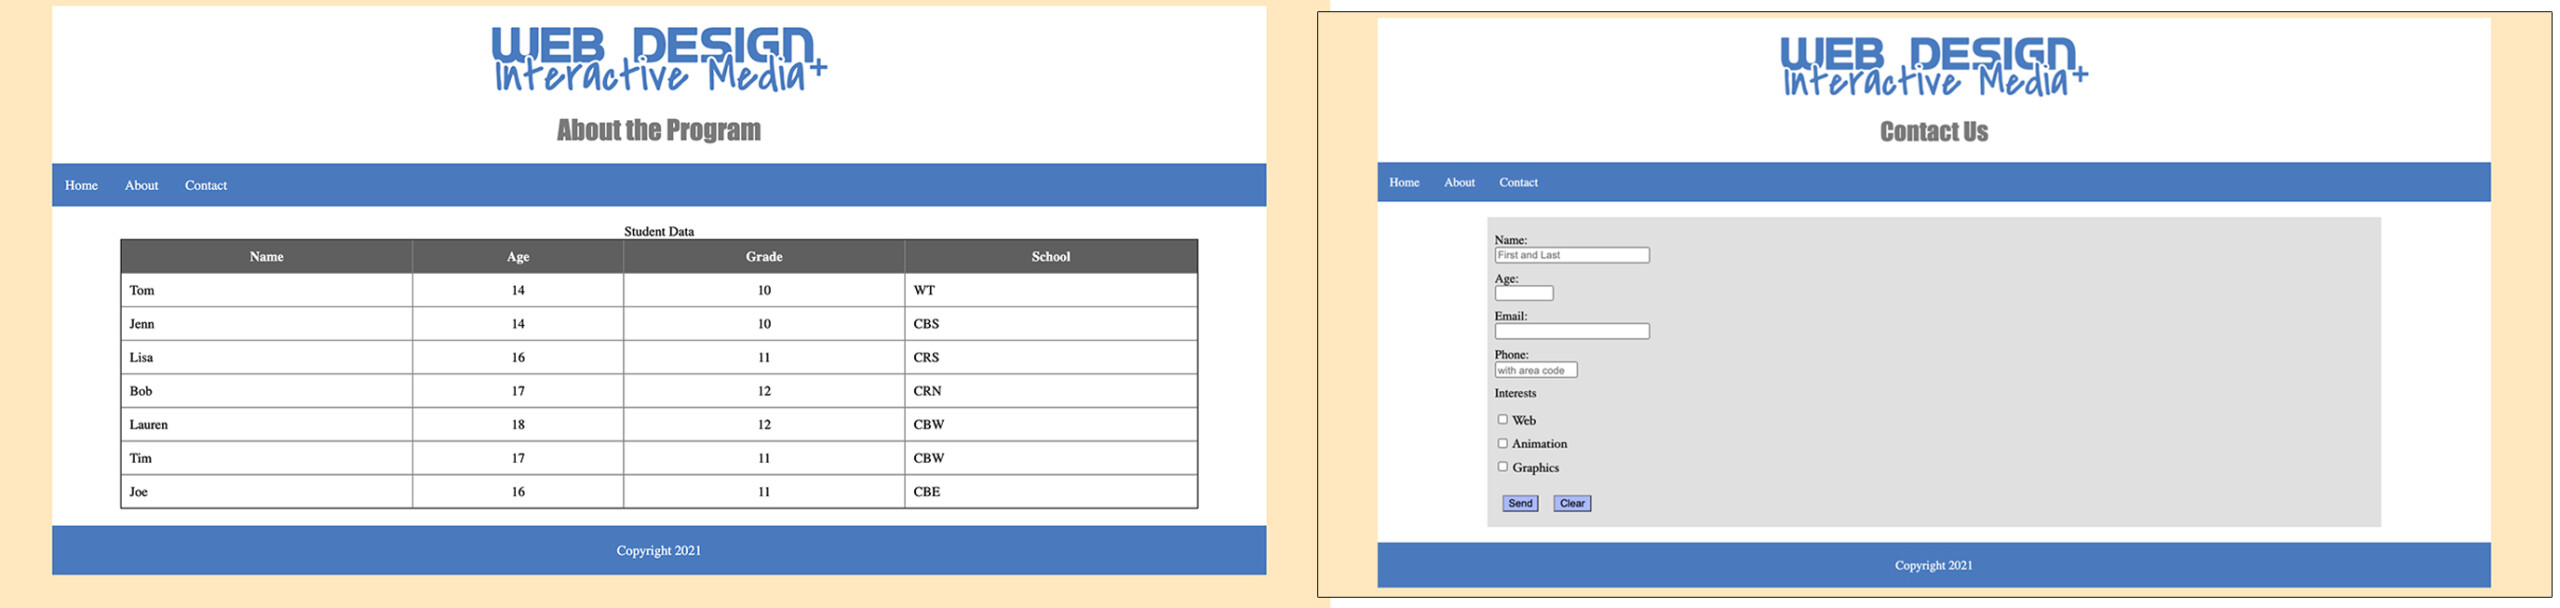
- You will be creating a table within the main of the document following these guidelines:
- a table that has 8 rows, 4 columns
- a table width of 90%
- borders of 1px
- a Header at the top of the table
- a Caption that reads: Students Data
- In Live View enter the data shown in the table below: (Do not copy and paste the formatting will be off!)
-
Name Age Grade School Tom 14 10 WT Jenn 14 10 CBS Lisa 16 11 CRS Bob 17 12 CRN Lauren 18 12 CBW Tim 17 11 CBW Joe 16 11 CBE - Create a class called .row for the first table row to have a background color of #5F5F5F and have the text color of: #FFFFFF and apply it to that row.
- Create a style for the table that collapses the border and gives it margin of 20px at the top and bottom and auto on the left and right.
- Create a class called .center that text aligns center. In design mode apply that center class to the second and third columns.
- In the table give the cell padding 10px.
- Save your work and Preview it! File > Save All.
- Open the contact.html file.
- You will be creating a form within the main of the document following these guidelines:
- Insert a form tag within the main.
- Within the form tag you will create the fields below in the table with the specifications:
-
Label Form Input Name of Input Size Notes: Name: Text name 30 PlaceHolder: First and Last Age: Text age 10 *required field Email: Email email 30 Maxlength of 30 Phone: Tel phone 15 PlaceHolder: with area code - Create a label called: Interests then insert a checkbox group input. Name the checkbox group: Interests and use the information below for the checkbox group:
-
Label Value Web Web Animation Animation Graphics Graphics - INSERT A FORM ELEMENT OF YOUR CHOOSING THAT HAS NOT BEEN USED YET! There are lots of option in the insert panel! (Make up your own label!)
- Insert a submit button with the value of: Send
- Insert a reset button with the value of: Reset
- Create a style that for the labels of display of block and margin-top of 10px.
- Delete the breaks between the checkboxes.
- Create a class called: .buttons and give it a margin of 10px all around as well as a background color of ##A8B7FF. Apply that class to the submit and reset buttons.
- Style the form to be a width of 80%, to have a background-color of #E0E0E0, a margin of 20px at the top and bottom and auto on the left and right, and padding of 10px.
- Save your work and Preview it! File > Save All.
- Submit the Ch6Exercise folder in the Shared Drive. It should include the CSS, and Images in order to work properly.
Chapter 6 Example